It’s no secret that every query and insight you type into commercial AI models is collected and repurposed as training data for corporations—whether you pay for access or not. If you want to break free from that, locally hosted AI puts you in control.
Hallucinations and inaccuracies aside, running a customised chatbot on your own system also means no subscriptions, no cloud dependencies, and no corporate oversight. Just an AI that operates entirely on your personal computer, learning from your input and adapting to your needs.
DeepSeek’s open-source models—DeepSeek-V3 and DeepSeek-R1—make this possible. Deploy them locally, and you decide how your AI learns while keeping your data fully private.
After extensive testing, we’ve identified three effective setup configurations that deliver exactly that. Here’s what you need to get started and how to make them work for you.
💡DeepSeek R1 excels at coding performance and can run on lower hardware requirements.
What are your best DeepSeek options for hosting a custom chatbot?
A custom DeepSeek model is a specialised version of the base model. Built on the powerful Transformer architecture, DeepSeek already excels at generating human-like text. But customisation transforms it into an expert in your specific domain—whether that’s customer support, educational tools, or specialised research.
The flexibility goes even further with DeepSeek’s distilled models. These compact versions—available in 1.5B, 7B, 8B, 14B, 32B, and 70B parameter sizes—maintain impressive reasoning capabilities while dramatically reducing hardware requirements.
What does this mean for you?
The smaller models (especially 8B and below) can run smoothly on standard computers with CPUs, GPUs, or Apple Silicon. No need for expensive cloud computing or dedicated hardware—you can deploy and experiment with these powerful AI tools right from your personal computer.
Based on proven architectures like the ones we’re about to discuss below, these models deliver exceptional performance even on modest setups.
How do you know what custom setup to choose?
Neither path is inherently superior—they serve different needs. Here are certain questions to ask before making your decision:
- Do you handle sensitive information that shouldn’t be processed on third-party servers?
- Do you have access to powerful hardware?
- Will you need to use the assistant without internet access?
- Is avoiding a subscription fee important?
- Do multiple team members need access to the same assistant?
We will explore each setup based on:
- Best use cases for each model
- Deployment scope
- Software or Hardware requirements
- Pros
No-code approach: Quick guide on hosting a custom DeepSeek R1 model using CodeGPT
CodeGPT offers a no-code, cloud-powered solution for running DeepSeek R1, ideal for teams and non-technical users seeking quick setup and shared access. Unlike GitHub Copilot, CodeGPT allows you to use your local LLMs, like DeepSeek R1, for prompts, code completion, unit testing, and more, within popular IDEs like VS Code, Cursor, and JetBrains.
It’s also a web-based platform with AI agents for broader team tasks. Simply create a free account to get started.
Computational Requirements:
- RAM: 1GB+ (more for larger models)
- Disk Space: 20MB+ (extra for local models)
- CPU: Intel Core i5+ (no older ARM support)
- macOS: All versions except Sonoma
- Linux: Supported from 2024 deployments
- Windows: Windows 11 or later
- IDE: VS Code 1.96.0+
- No VLAN/VPN unless authorised
- Internet required for CodeGPT
Implementation Process:
To run DeepSeek R1 on CodeGPT, you can follow these steps:
- Step 1: Sign up or log in at codegpt.co using Google or GitHub, then create a new AI agent and select DeepSeek R1 as the model.
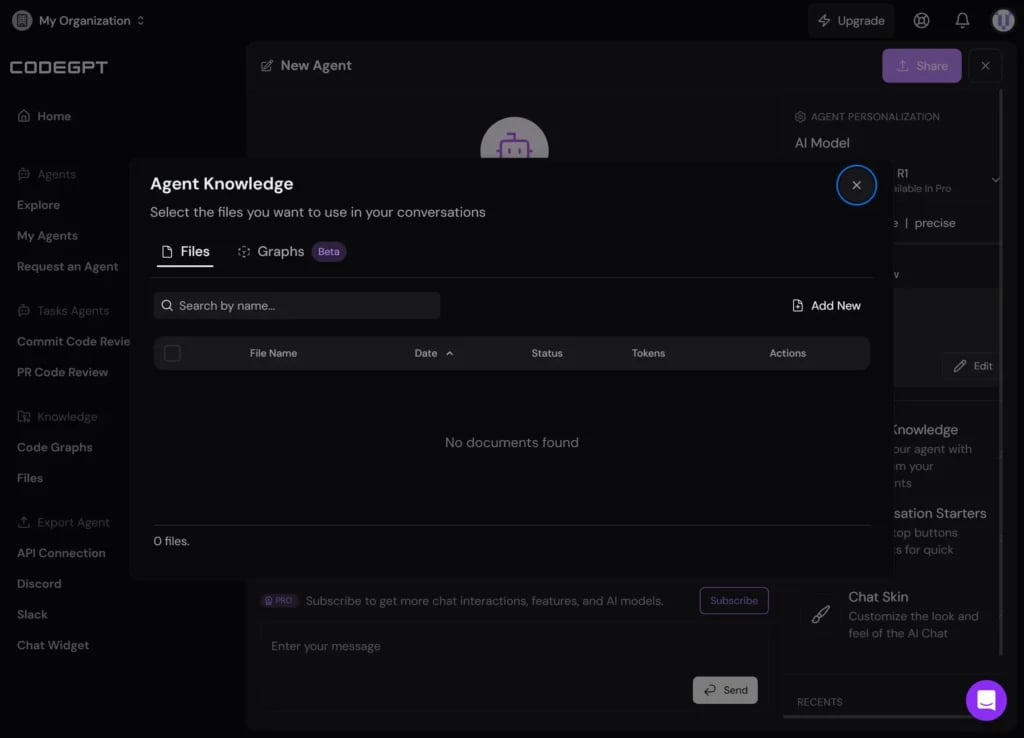
- Step 2: Upload your documents or GitHub repositories in the “Agent Knowledge” section to provide the agent with its data. It is to serve as your private knowledge base.
- Step 3: In the “Instructions” tab, set a system prompt to limit responses to your uploaded data, and optionally add rules for accuracy and behavior.
- Step 4: Test your agent’s responses to ensure accuracy, then publish it and share it via a public link or within your organisation.
- Step 5: Regularly review your agent’s performance in the “Agent History” panel, using metrics to refine accuracy and efficiency.
Note that: CodeGPT utilises the power of generative AI for all its features. It may not always provide the correct information. Hence, you need to counter-check whether its results are correct.
Why use CodeGPT to run a custom DeepSeek R1 model?
- Zero technical knowledge required
- Easy document management
- Built-in analytics and monitoring
- Shareable with multiple users
Code-based: How to run a custom DeepSeek R1 model on LM Studio and Ollama
Method 1: Running custom DeepSeek R1 on LM Studio
For complete data sovereignty and offline DeepSeek R1 operation, LM Studio offers a powerful self-hosting solution, though it does require a degree of technical proficiency. LM Studio streamlines model discovery, download, and local execution, exposing a compatible API for seamless integration. It enables function calling for advanced prompt interactions and allows granular model tuning via its ‘Advanced Configurations.’
Even without high-end hardware, you can unlock DeepSeek R1’s core capabilities. Notably, DeepSeek R1’s output includes descriptive ‘thinking’ stages, providing insight into its reasoning process, which you can choose to display or suppress.
Computational Requirements
- Minimum 16GB RAM (more is better)
- Disk Space: 20GB+
- CPU: AVX2 instruction support
- macOS: M1/M2/M3, Windows: x86 or ARM, Linux: x86
- No specific IDE required
- GPU: Recommended for optimal performance (e.g., NVIDIA RTX 3070)
Implementation Process:
- Step 1: Download LM Studio from its official website. Then, run the installer and follow the on-screen prompts to complete the installation.
- Step 2: Open LM Studio and familiarise yourself with the sidebar tabs: “Chat,” “Developer,” “My Models,” and “Discover.”
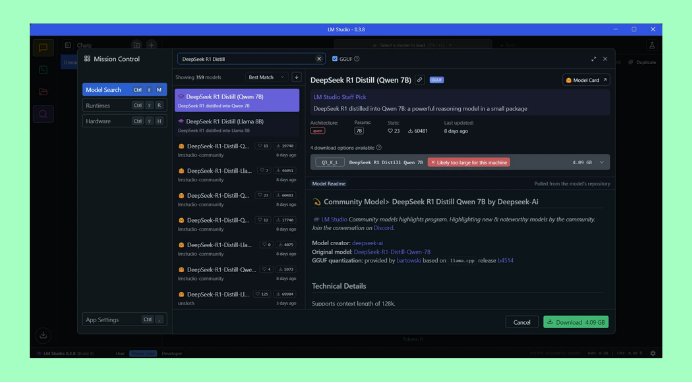
- Step 3: Navigate to the “Discover” tab (magnifying glass icon) and search for “DeepSeek R1 Distill” models, such as Qwen-7B or Llama 8B.
- Step 4: Select an appropriate quantised version based on your hardware. For example, Qwen-7B is a good starting point. Ensure both the “GGUF” and “MLX” checkboxes are selected for compatibility.
- Step 5: Click the green “Download” button and wait for completion.
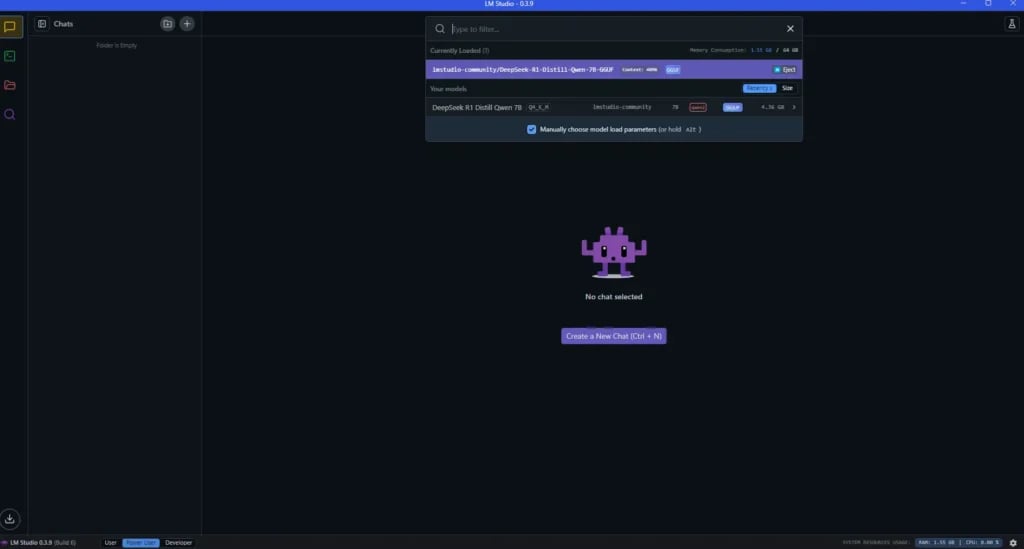
- Step 6: Go to the “Chat” tab, click “Select a model to load,” choose the downloaded DeepSeek R1 model, and begin interacting with it by typing your prompts.
Note: It is recommended to start with smaller models for limited hardware. Also, use LM Studio 0.3.7 Build 2 for compatibility and leverage the Hugging Face model card for detailed technical specifications.
Why use LM Studio to run DeepSeek R1?
- Complete data privacy
- User-friendly
- Works offline, even on flights.
- No subscription costs.
- Ability to swap between different models.
Method 2: Running custom DeepSeek R1 on Ollama
For running local LLMs, Ollama is a popular choice, especially if you’re comfortable with the command line or need programmatic control. It supports numerous AI models, including DeepSeek R1.
These models are available in various sizes (1.5b to 70b), quantised formats (q4_K_M, q8_0), and distilled versions (qwen-distill, llama-distill) to balance performance and resource use. Plus, it’s cross-platform, running smoothly on macOS, Windows, and Linux and requires minimal setup.
Computational Requirements
- RAM: minimum of 8GB (more when working with larger models)
- Disk Space: 500GB+, though this may vary depending on the specific model variant you choose.
- CPU: Intel Core i5 or higher
- Software:
- Operating System: macOS, Linux, and Windows.
- IDE: VSCode version 1.96.0 or higher
- Node.js: Version 20.0.0 or higher.
Implementation Process:
Step 1: Install Ollama
Before running DeepSeek R1, you need to install Ollama on your system.
- For macOS (using Homebrew), type the following command to install Ollama:
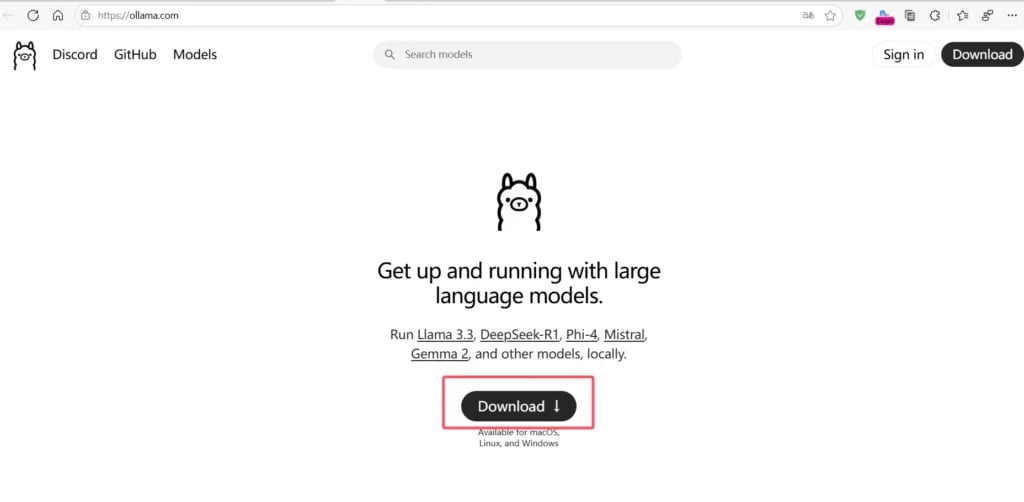
brew install ollama. - For Windows and Linux: Visit Ollama’s official website for platform-specific installation instructions.
Step 2: Download the DeepSeek R1 model
Once Ollama is installed, download the DeepSeek R1 model:
ollama pull deepseek-r1By default, this downloads the main DeepSeek R1 model (which is large). If you want a smaller variant, specify the size using its tag, such as:
ollama pull deepseek-r1:1.5b This fetches the 1.5B distilled variant, which is optimised for performance. Other examples include:
ollama pull deepseek-r1:7b
ollama pull deepseek-r1:14b-qwen-distill-q4_K_M
ollama pull deepseek-r1:1.70b-llama-distill-fp16
Step 3: Start the Ollama server
To ensure Ollama is ready to run AI models, start its server in a new terminal window:
ollama serveStep 4: Run DeepSeek R1 locally
Now, interact with the model directly from the terminal:
ollama run deepseek-r1For a specific model variant, use the model tag (e.g., 7B):
ollama run deepseek-r1:7bStep 5: Send queries to the model
You can now start prompting DeepSeek R1:
ollama run deepseek-r1:7b “Who is Condia?”The steps covered so far involve interacting with DeepSeek R1 directly through the command line. However, Ollama also provides an API (Application Programming Interface) option rather than typing commands directly.
Using the Ollama API
The following step demonstrates how to use the API with curl commands, which are a common way to send requests to web-based APIs.
- For example, to generate texts from your terminal, enter:
curl http://localhost:11434/api/generate -d ‘{
“model”: “deepseek-r1:7b”,
“prompt”: “write a Python function that reverses a given string.”
}’
Why use Ollama for DeepSeek R1?
- Quick setup with straightforward commands.
- Everything runs on your own machine, ensuring full data privacy.
- Easily switch between different AI models as needed.
Final thoughts
Understanding generative AI’s strengths and weaknesses enables you to build effective AI assistants. Define your purpose, test with small tasks, and keep your knowledge base updated. This guide showed you how easy it is to run DeepSeek R1 locally using CodeGPT, LM Studio and Ollama. Now, you can explore the potential of local LLMs.
FAQs on custom DeepSeek R1 hosting
Q: Who owns DeepSeek?
A: DeepSeek is a privately held AI company in Hangzhou, China, funded by High-Flyer under Liang Wenfeng’s leadership.
Q: Which DeepSeek R1 model should I choose?
A: For maximum performance on powerful hardware, use the main DeepSeek R1 model. For a faster generation on limited resources, choose a distilled variant like 1.5B or 14B.
Q: Are these custom options free to use?
A:Ollama and LM Studio are free and open-source. DeepSeek R1’s licensing typically permits free usage, including commercial applications. Cloud services for fine-tuning may cost. CodeGPT has a free account with limitations.
Q: Can I run DeepSeek R1 on remote servers or in Docker?
A: Yes, you can run DeepSeek R1 in Docker containers, on cloud virtual machines, or on on-premises servers, as long as Ollama can be installed.
Q: Is it possible to fine-tune DeepSeek on a mobile phone?
A: Fine-tuning directly on a mobile phone is generally not feasible due to high computational demands. However, you can use your phone to remotely access powerful computers or cloud services for fine-tuning.
Q: Are these models suitable for commercial use?
A: Yes, the DeepSeek R1 series models are MIT-licensed, and the Qwen-distilled variants are under Apache 2.0. Llama-based variants have their own license. Please verify the specific license details for your intended use.
Q: What hardware is required to run DeepSeek R1 models?
A: Hardware requirements vary by model size: 1.5B models can run on standard PCs with 8GB RAM. 7-32B models require powerful GPUs (8-24GB VRAM) and 32-64GB RAM. 70B+ models demand multi-GPU setups with high VRAM and 128+ GB RAM.
Get passive updates on African tech & startups
View and choose the stories to interact with on our WhatsApp Channel
ExploreLast updated: March 11, 2025